STEP 1: Have a valid form of ID handy
Go to the USI Registry System (https://portal.usi.gov.au/student/), and have a valid form of ID ready.
Have at least one form of current and valid ID handy that will be acceptable. Don’t worry, many
forms of ID are acceptable and most people will own not one but two or three forms of ID. If you do
not have one of these forms of ID, contact us for assistance.
IMPORTANT: When you create your USI, enter your details exactly as they appear on your form of
ID.
STEP 2: : Read and agree to the terms and conditions.
(If you have previously agreed to the terms and conditions, you might not see this step)
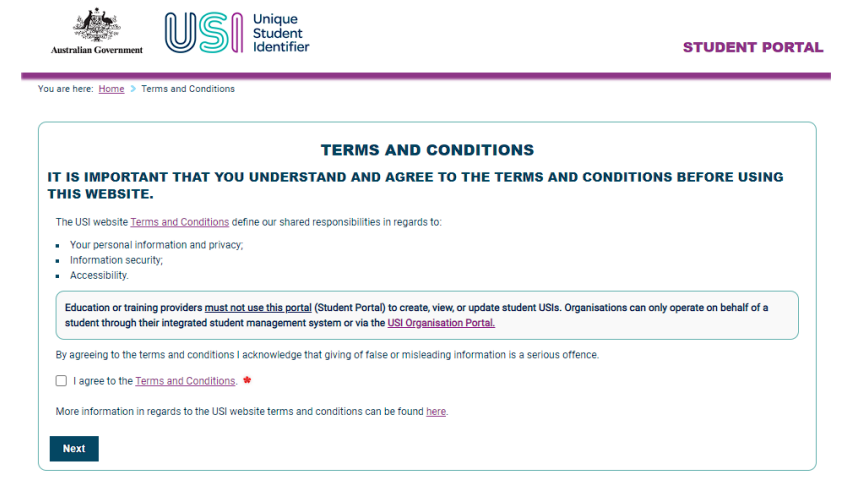

You only need to fill in a few details and have one form of ID to verify who you are. It should only
take you about 5 minutes. Please select Create USI
STEP 4: Select your evidence of identity document
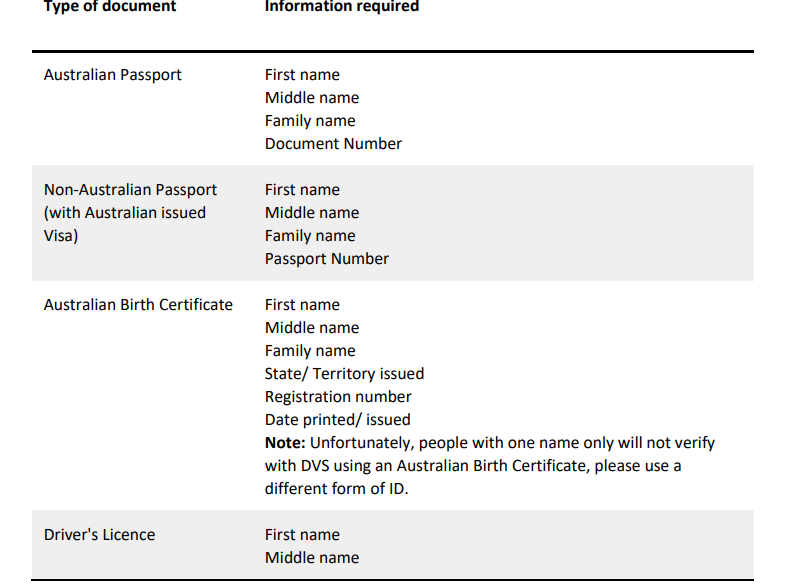
See below the types of ID that is acceptable:
• Australian passport
• non-Australian passport (with Australian Visa)
• Australian birth certificate – please note: a birth certificate extract or commemorative birth
certificate will not be accepted
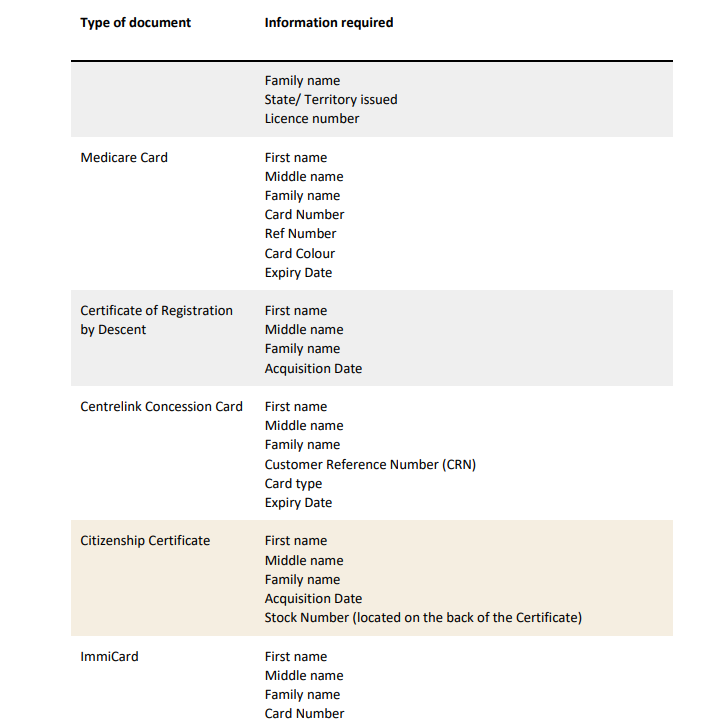
• Australian driver’s licence
• Medicare card
• certificate of registration by descent
• Centrelink concession card
• citizenship certificate
• ImmiCard
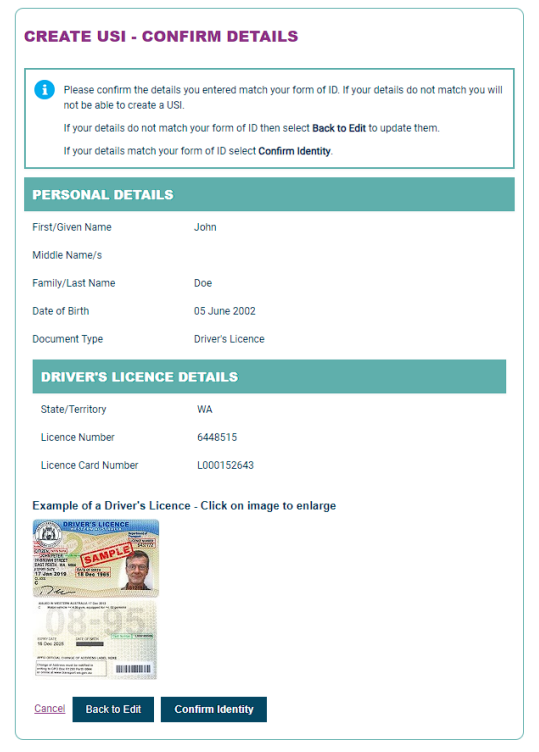
Important: The personal details you enter must match those shown on your identification.
STEP 5: Enter your personal details exactly as they appear on your form of ID.
Contact details options include:
• Email
• Mobile phone
• Home phone number
• Mailing address.
You must provide your country of residence.
Note: If you use a mailing address as your preferred contact method, you will still need access to a
computer to activate your USI account or change your password. If the name you use for business or
official purposes is not the name on your form of ID, you can choose to enter this in the preferred
name field.
STEP 6: Enter your contact details, including at least two contact methods.
Once you have entered your details,
the USI Registry System will check
and confirm your identity using
the ‘Documentation Verification
Service’ (DVS)
STEP 7: Securing your account
Next set your USI password and
check questions.
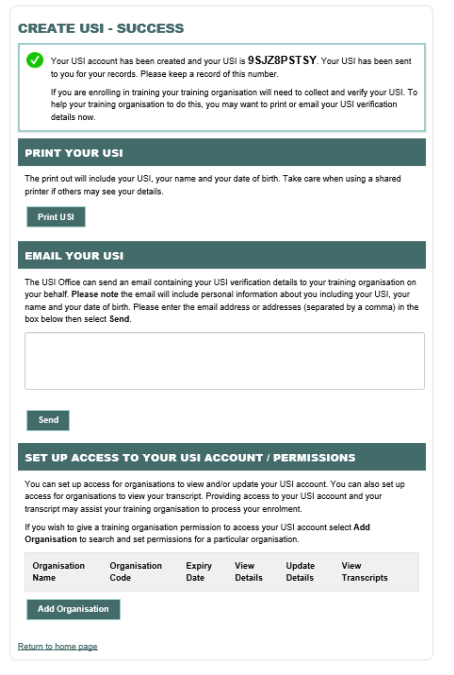
STEP 8: You’re done!
Your USI will now be displayed on the screen and will have been sent to you for your records. Please keep a record of this number as this USI is yours for life!
If you are enrolling in training your training organisation will need to collect and verify your USI. To help your training organisation to do this, you may want to print or email your USI verification
details from this screen.
STEP 9: What’s Next?
Each time you enrol with a new training organisation, remember to give them your USI – either by email or by providing access.
How do I create a USI on behalf of another person?
Sometimes you may have to create a USI on behalf of another person. Below is a step by step guide
showing you what you will need to do to create a USI on behalf of another person.
STEP 1: Have a valid form of ID for the student ready
STEP 2: Go to the Create your USI page for students
STEP 3: Agree to the Terms and Conditions
STEP 4: Applying for a USI on behalf of another person
STEP 5: Your Details
STEP 6: Evidence of Identity
STEP 7: The student’s personal details
STEP 8: The student’s contact details
STEP 9: You’re done!
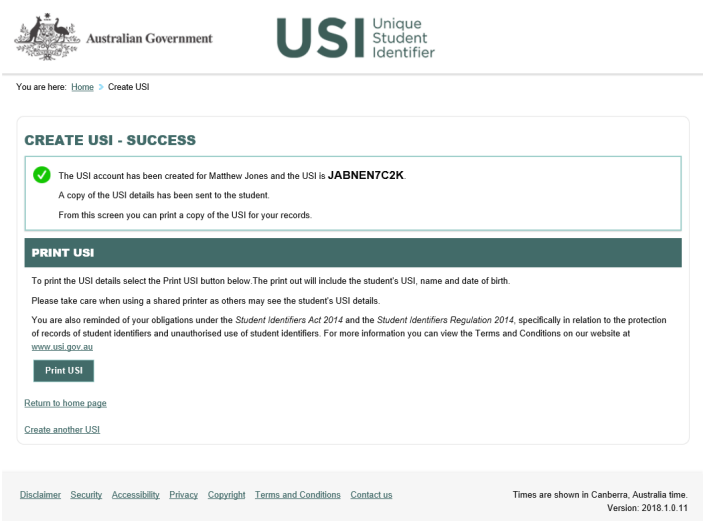
The ‘Create USI – Success’ screen will provide details of the USI and on whose behalf it was created. A copy of the USI details will be sent to the student via their preferred method of contact which will include an Activation Link. This requires the student to secure their USI account by setting their Password and Check Questions. You cannot do this on their behalf. If the student needs to provide their USI to an education or training provider, from this screen you can print a copy of the key USI details that need to be provided to the education or training provider.
When you create your USI, we ask you to provide a valid form of ID to make sure that the USI is unique to you and not used by another person, and to make sure that you don’t accidentally create two USIs.
To create a USI you will need to use a valid form of Australian ID from the list below. You won’t need to upload a copy of your ID; you will simply need to type in some of the information that appears on your ID.
Important: Personal details entered must match those shown on your form of ID. The USI Registry System uses the Documentation Verification Service or DVS to verify the details you have entered are correct.
One of the following are acceptable forms of ID:
• Australian Passport
• Non-Australian Passport (with Australian Visa)
• Australian Birth Certificate
Please note a Birth Certificate extract or Commemorative Birth Certificate will not verify
• Australian Driver’s Licence
• Medicare Card
• Certificate of Registration By Descent
• Centrelink Concession Card
• Citizenship Certificate
• ImmiCard
If you don’t have one of these forms of ID, please contact your training organisation for assistance. We don’t keep any of the information from your ID, although we do keep some of your personal information which may also appear on your ID. If you would like more information about what data we keep, you can view the Student Identifiers Registrar’s Privacy Policy.
Students who do not have standard forms of identity
The OSIR understands some students may not have had their birth registered and/or have access to standard verifiable identification documents.
Incarcerated students
Students who are currently sentenced or on remand within a correctional facility may not have access to standard verifiable identification documents. With consent from the student, training organisations may create a USI on behalf of an incarcerated student using the Incarcerated Students Evidence of Identity Form. The form also allows the student to authorise a correction/education
officer to act on their behalf when engaging with the OSIR to verify, amend and/or create a unique
student identifier.
Indigenous students
Some indigenous students may not have had their birth registered with a Register of Births, Deaths and Marriages. The Aboriginal and Torres Strait Islander Peoples Evidence of Identity Form allows students to provide all necessary information, in lieu of standard verifiable identification, for training organisations to create a USI on their behalf.
The information required from each form of ID are shown below
To create a USI, you will need to provide personal details and contact information. The information provided will help in avoiding the creation of duplicate USIs and ensure your training records are
linked to your USI account.
Your personal details include:
• name
• date of birth
• place and country of birth
• gender
Your contact information includes:
• email address
• mobile phone
• home phone (optional)
• postal address
You can access and update your records in the USI Registry System at any time. You will need to provide a new form of ID to update your personal details. No proof of ID is required to update contact information.
Training organisations can also update your records in the USI Registry System, if you have given them permission.
Important: Personal details entered must match those shown on your form of ID.
Note: If you have given permission to a training organisation to view and/or update your USI account but you do not want them to see your contact information, you can select ‘Hide Contact
Details’ in the USI Registry System.
Name
Your date of birth
Enter your date of birth as shown on your form of ID in the format Day/Month/Year.
Your place and country of birth
Country of birth
Enter your country of birth as the country where you were born. If the name of your country of birth
has changed, enter the current name.
Town/city of birth
Enter your town/city of birth as the town/city where you were born.
If the name of your town/city of birth has changed, enter the current name.
Your gender
Gender is part of a person’s personal and social identity referring to the way a person feels,
presents, and is known within their community.
Gender options on your USI account include M (male), F (female), or X
(indeterminate/intersex/unspecified). You do not need to provide proof of your gender.
When you create your Unique Student Identifier (USI) you will need to enter as many of your contact details as you can. This will help us get in touch with you if we need to. It is important that these details are up-to-date and correctly entered.
You can enter:
• email
• mobile phone
• home phone number
• mailing address
Note: You must provide your country of residence. If you use a mailing address as your preferred
contact method you will still need to access a computer to activate your USI account or change your
password.
Why will you contact me?
The Office of the Student Identifiers Registrar will contact you to:
• send you a link to activate your USI account
• advise you if your USI account details have been changed
• reset and advise you of a new password if you request one
• provide you with your USI if you forget it
• respond to your enquiries and help requests
One you have created your USI it will be displayed on your screen, write it down for safe keeping.
Depending on which contact details you entered, your USI will be sent to your:
One you have created your USI it will be displayed on your screen, write it down for safe keeping.
Depending on which contact details you entered, your USI will be sent to your:
• email
• mobile number
• mailing address
Note: If your contact details change, please ensure you update your USI account.
Can I hide my contact details?
Yes, select ‘Hide Contact Details’ if you do not want your contact details displayed to providers you
have given permission to view and update your USI account.
What email address should I use?
Your chosen email address is where emails will be sent to you. You must use an email address that is unique to you because your email address can also be used as your User ID when logging into the USI Registry System. If you do not have an email address you can leave this field blank.
Note: For privacy reasons the USI Registry System does not allow an email address to be used on
more than one USI account.
Mobile number
Your mobile number is the number on which you may be contacted or receive SMS messages. Cell number is another term used for mobile number.
Home phone number
You may also wish to add your home phone number as an additional contact number.
Mailing address
Your address is where you can be contacted by mail. This can be either a post office box, locked bag
address or your home address, including street number and street name.
Suburb/Town/City
Suburb/town/city is where your address is located.
State
State is the state or territory where your address is located.
Postcode
Postcode relates to the suburb/town/city of your address.
Lorem ipsum dolor sit amet, consectetur adipiscing elit. Ut elit tellus, luctus nec ullamcorper mattis, pulvinar dapibus leo.